Greenhouse Drip Irrigation Explained: A UK Buyer's Guide
Maintaining the perfect microclimate in a British greenhouse is a delicate balancing act. Between the unpredictable UK weather, sudden summer heatwaves, and the intense transpiration rates of glasshouse crops like tomatoes and cucumbers, manual watering quickly becomes a full-time job. More importantly, overhead watering with a watering can or hosepipe often leads to splashed foliage, encouraging fungal diseases such as botrytis and tomato blight—conditions that thrive in the humid, enclosed environment of a greenhouse.
The horticultural solution favoured by both commercial growers and serious allotment holders is greenhouse drip irrigation. By delivering water directly to the root zone at a controlled rate, you eliminate water waste, prevent soil erosion, and keep foliage perfectly dry. According to the Royal Horticultural Society (RHS), targeted drip systems are up to 90% more efficient than traditional hose watering, a crucial statistic for UK gardeners navigating regional water shortages and summer hosepipe bans.
Key Takeaways
- Disease Prevention: Greenhouse drip irrigation keeps plant foliage dry, drastically reducing the risk of fungal infections common in UK glasshouses.
- Water Efficiency: Targeted watering minimises evaporation and runoff, ensuring compliance with local water usage restrictions during dry British summers.
- Precision Control: Utilising 360° adjustable drip emitters allows you to tailor water flow to the specific needs of different crops on the same watering line.
- Automation: Pairing your setup with a timer guarantees your beds, borders, and grow bags thrive, even when you are away on holiday.
Why Greenhouse Drip Irrigation is Essential for UK Gardeners
The environment inside a greenhouse is highly artificial. While it allows UK gardeners to extend the growing season and cultivate tender crops, it also entirely cuts plants off from natural rainfall. Consequently, the responsibility of moisture management falls entirely on the gardener. Fluctuating temperatures under glass can cause soil in pots and grow bags to dry out in a matter of hours during July and August.
Implementing a greenhouse drip irrigation system transforms this high-stakes environment into a manageable, automated oasis. When water is applied slowly via emitters, it penetrates deeply into the compost or soil border, encouraging roots to grow downwards rather than remaining near the surface where they are vulnerable to heat stress. This deep-watering technique is vital for heavy-feeding crops like greenhouse tomatoes, where inconsistent watering leads directly to blossom end rot and split fruit.
Furthermore, an automatic watering system ensures consistency. Plants do not experience the stress of alternating between drought and waterlogging. By maintaining a steady, optimal moisture level, you promote vigorous vegetative growth and significantly higher fruit yields.
Core Components of a Greenhouse Drip System
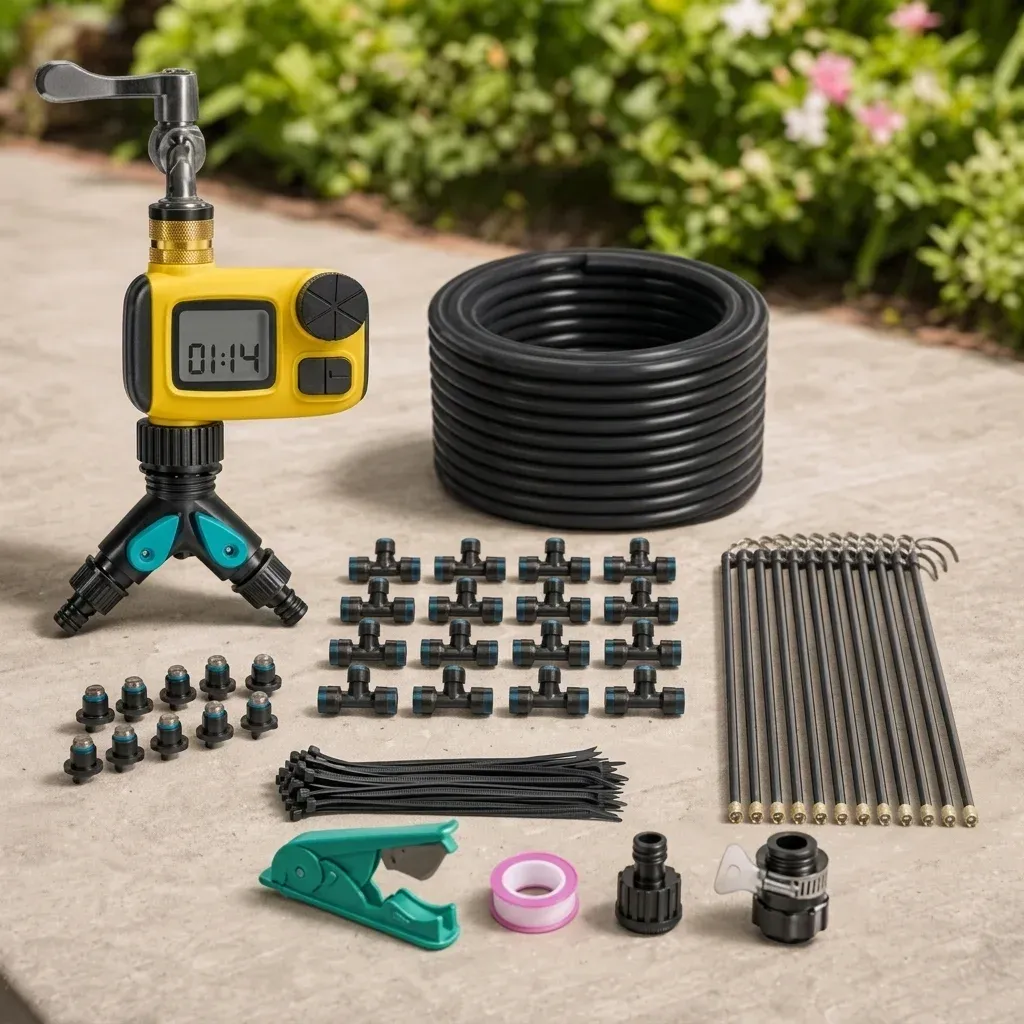
Understanding the anatomy of your irrigation setup is the first step toward building a reliable system. A premium kit, such as the DripSystem, includes several meticulously engineered components designed to work in harmony.
The Water Timer
The brain of your greenhouse drip irrigation setup is the timer. Connected directly to your garden tap, it dictates the frequency and duration of your watering cycles. For greenhouse environments, where early morning watering is optimal to allow excess surface moisture to evaporate before midday heat, a programmable timer is indispensable. For a deep dive into selecting and programming the right controller, read our guide on the smart water timer.
Supply Tubing and Micro-Bore Pipe
Water is transported from the tap to the greenhouse via the main supply tubing (typically 13mm or 14mm). Once inside the greenhouse, this main line acts as a spine, usually run along the floor or the back of the staging. From this main spine, smaller 4mm micro-tubing branches off to reach individual pots, grow bags, or specific plants in the soil border. This branched network ensures tidy organisation and prevents tripping hazards in confined glasshouse spaces.
360° Adjustable Drip Emitters
Not all plants have the same water requirements. A mature cucumber plant will consume significantly more water than a tray of newly pricked-out seedlings. This is where adjustable drip emitters become the most valuable tool in your greenhouse arsenal. DripSystem’s premium 360° emitters allow you to twist the cap to increase, decrease, or completely shut off the water flow for each specific plant, providing bespoke hydration across your entire greenhouse.
Pressure Reducers and Filters
UK mains water press generally too high for micro-irrigation systems and can cause emitters to blow off the tubing. A pressure reducing valve (usually stepping pressure down to around 1.5 bar) is crucial. Additionally, an inline filter prevents microscopic debris, limescale, or grit from clogging the fine nozzles of your drip emitters.
Planning Your Greenhouse Drip Irrigation Layout
Before cutting any tubing, careful planning is required. Greenhouses typically feature a mix of growing environments: soil borders down one side, staging with seed trays or pots on the other, and perhaps grow bags for tomatoes at the rear. Your greenhouse drip irrigation system must accommodate this varied topography.
Mapping the Main Line
Draw a rough sketch of your greenhouse. The most efficient layout usually involves bringing the main 13mm supply pipe through the door or a dedicated base vent, and running it in a 'U' shape around the perimeter of the greenhouse floor. If you have deep staging, you may wish to run a secondary main line securely fastened to the back of the staging bench.
Calculating Emitter Spacing
For grow bags (typically containing three tomato or pepper plants), you will need one emitter per plant. For soil borders, space emitters approximately 30cm apart to ensure overlapping zones of moisture, creating a continuous damp band beneath the soil surface. When dealing with large pots (over 10 litres), consider placing two emitters on opposite sides of the root ball to encourage even root distribution.
"The secret to successful greenhouse drip irrigation is zoning. Group plants with similar water demands together. Place your thirsty cucumbers and aubergines on one side, and your drought-tolerant Mediterranean herbs on another, adjusting your 360° emitters accordingly."
Step-by-Step Installation Guide
Installing the Ultimate Drip Irrigation System with Timer is a straightforward DIY task that requires no specialist plumbing tools. Follow these steps to equip your greenhouse.
- Connect to the Source: Attach your timer to the outside tap. Screw the pressure reducer and filter directly beneath the timer.
- Lay the Main Tubing: Run your 13mm supply pipe from the tap to the greenhouse. Lay it out in the sun for an hour beforehand; the warmth will make the plastic much more pliable and easier to uncoil.
- Secure the Layout: Use ground stakes to pin the main tubing securely in place around the perimeter of your greenhouse borders or along the back of your staging.
- Punch and Branch: Using a dedicated hole punch tool, pierce the 13mm pipe adjacent to each plant. Insert a straight or T-connector, and attach a length of 4mm micro-tubing.
- Attach the Emitters: Push a 360° adjustable drip emitter onto the end of each piece of micro-tubing, and secure it in the soil near the base of the plant using a support stake. Ensure the emitter is pointing towards the root zone, not directly against the plant stem, to avoid collar rot.
- Test and Adjust: Cap the end of the main supply line. Turn the system on manually via the timer. Walk through the greenhouse and adjust the cap on every single emitter until you achieve the desired drip rate for each specific plant.
For a broader look at integrating this setup with your outdoor spaces, review our comprehensive automatic watering system guide.
Common Mistakes to Avoid in UK Glasshouses
Even with a premium automatic watering system, human error can hinder plant health. Avoid these common pitfalls to ensure your greenhouse thrives.
Overwatering in Early Spring and Late Autumn
A common mistake is setting the timer in May and leaving it unchanged until October. The water requirements of a greenhouse in the mild, cloudy days of a British spring are vastly different from those during a July heatwave. Adjust your timer's frequency and duration at least once a month to reflect the changing seasons and daylight hours.
Using Water Butts Without Proper Filtration
Many UK gardeners prefer to use harvested rainwater for their greenhouse crops. While excellent for plants, water butts are notorious for harbouring algae, roof moss, and debris. If you are running a gravity-fed greenhouse drip irrigation system from a water butt, you must use a high-quality, fine-mesh inline filter, and elevate the butt sufficiently to generate enough pressure to push water through the emitters.
Failing to Winterise the System
British winters bring freezing temperatures that can easily penetrate an unheated greenhouse. Water left inside the micro-tubing and timer will expand as it freezes, potentially cracking the plastic components. In late autumn, disconnect the timer and bring it indoors. Open the end caps of your supply lines and allow all water to drain completely to protect your investment for the following year.
Frequently Asked Questions
Can I run a greenhouse drip irrigation system from a water butt?
Yes, but it requires careful setup. Gravity-fed systems require the water butt to be elevated (at least 30-50cm above the highest emitter) to create sufficient head pressure. You must also ensure the water is heavily filtered to prevent algae and debris from clogging the micro-tubing and emitters.
How long should I run my greenhouse drip irrigation each day?
This depends entirely on the season, the size of the plants, and the flow rate of your emitters. As a baseline for mid-summer greenhouse tomatoes, running the system for 15-20 minutes early in the morning and perhaps another 10 minutes in the late afternoon is common. Monitor the soil moisture levels closely in the first week and adjust your timer accordingly.
Will drip irrigation prevent tomato blight?
While no system can completely guarantee immunity from airborne spores, greenhouse drip irrigation significantly reduces the risk. Blight and botrytis require wet foliage to take hold and spread. By delivering water directly to the soil and keeping the leaves completely dry, drip systems remove the primary environmental condition these diseases need to thrive.
Are 360° adjustable emitters difficult to maintain?
Not at all. The primary advantage of DripSystem’s premium adjustable emitters is that they can be easily unscrewed and cleaned. If you notice a drop in flow rate, simply twist the cap off, rinse it under a tap to remove any microscopic grit or limescale build-up, and screw it back on.
Transform Your Greenhouse Today
Managing the intensive demands of greenhouse growing doesn't have to mean being tethered to a watering can. By investing in a high-quality greenhouse drip irrigation setup, you guarantee precise hydration, healthier root systems, and vastly improved yields for your tomatoes, cucumbers, and tender exotics.
Keep your beds, borders, and greenhouse thriving with our premium automatic watering system featuring 360° adjustable drip emitters. Experience the peace of mind that comes with reliable, automated plant care.
Ready to automate your watering with DripSystem?
Shop The Kit — £85.53